The standard hammers used in our mills are double end reversible types, which have four wearing edges. When hammers become dull to the point where the machine is not grinding efficiently or when the hammers are well rounded, turn the hammers so a new sharp edge will be in service. One row of hammers should be turned at a time so the rotor balance will not be changed. Do not allow the hammers to wear too far or you will lose the opposite two cutting edges. Hammers can be changed through the access door in the mill with the hammer rods sliding through the access doors on the sides of the mill top, or through the main access door.
The hammers installed in your Schutte Hammermill mill were carefully balanced at the factory. New sets of replacement hammers sent from our factory are also carefully balanced and wired in rows. Always work on one row of hammers at a time and do not interchange hammers from one row to another. Careless handling of hammers can cause excessive vibration.
Installation Instructions: Balance By The Clock Method
Note: Upon arrival, note that each row or stack of hammers are numbered on the top hammer. They are numbered 1-8.
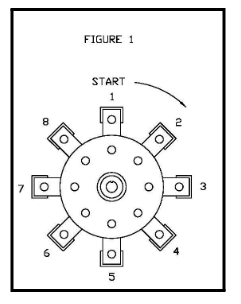
- Start with the row marked “1”. As illustrated in Figure #1, insert one hammer between every other disc. (In some cases, two hammers will be placed between each disc, depending on style of rotor).
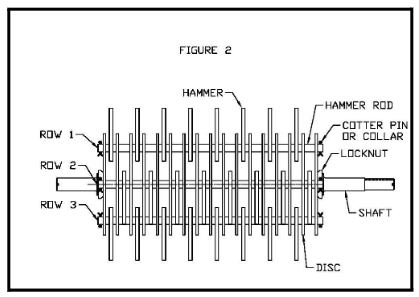
- Row 2 will follow with the hammers being staggered between the discs opposite the previous row. (See Figure #2)
- Continue installing the hammers in this manner working around the rotor in numerical order. (See Figure #1)
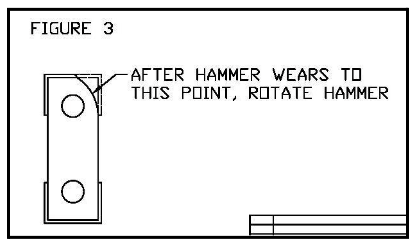
- Each hammer has four (4) wearing edges. Hammers should be rotated when the grinding edge wears to approximately half way between the hole and the original corner. Do not allow hammers to wear beyond this point or you will lose the ability to utilize all four edges. (See Figure #3)
- It is recommended that you replace the hammer rods when they show signs of wear (as a general rule of thumb, replace the set of rods following the usage of all four edges of the hammer). When rotating the hammers, check for premature wear to the rod itself. Excessive grooving of the rod will indicate a need for replacement.
- Install collars or cotter pins in the end of each rod following hammer rotation or replacement.