
To prepare for replacement, contact us for a set of replacement hammers. Each row of hammers is wired into a specific order and balanced as a set at the factory. You must maintain the order of the hammers and this balance as you make changes. If you do not, the unbalanced hammers can cause excessive vibration.
For Rotation: Follow steps 1 – 11 below, and rotate the stack of hammers to use a fresh striking edge before completing steps 12-15.
For Replacement: New hammers are delivered in groups marked 1 to 8. Place the new hammers for Group 1 into Row 1, as described in Steps 12-15.
Steps:
- Switch off the main power supply breaker.
- Secure the main switch using your site’s OSHA-approved lockout/tagout procedure.
- Open the mill hood.
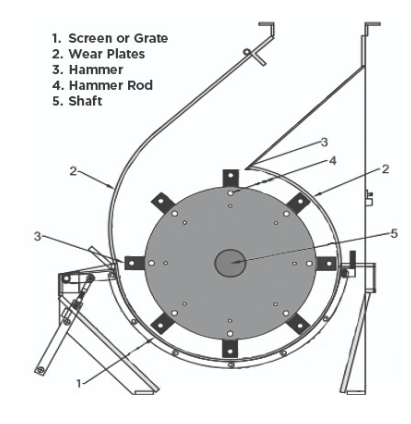
- Start with the first row
- Remove the collar from one end of the row.
- Pull out the rod and, as each hammer is released, remove the hammer.
- Stack each hammer in the same order as on the rod.
- Inspect the rod.
- If you see excessive grooving on the rod, replace the hammer rod.
- If you are replacing the hammers, you should also replace the hammer rod.
- Start with Row 1. Insert one hammer between every other disc . (Some rotors use 2 hammers between each disc.)
- Insert the hammer rod to hold the hammer in position.
- Insert the next hammer and continue until all hammers for Row 1 are in place.
- Lock the rod, using the collar or cotter pin in the end of the rod.
- On Row 2, stagger the hammers between the discs opposite Row 1.
- Continue installing the hammers on the rods, working around the rotor in numerical order from Rows 3 through 8.
- After all the hammers have been re-installed, rotate the rotor by hand to ensure there are no catches.
- Close the mill hood.